Create a Gradle Java Project

We will set up a CI/CD pipeline for a Java Gradle project. The project resides and is maintained in a Github repository. Anytime a new push or a pull request is made on the repo, the latest version of the project's code is compiled and built, tested againsted all the existing (unit) tests, and published as a docker image into Docker Hub. Along the way, we explore some exciting topics such as the use of secrets in GitHub Actions, running tests against the project's code and reporting code coverages, and conditional publishing to Docker Hub only if a certain coverage treshold is met. By the end of this tutorial you should have a fully automated GitHub Action pipleline that publishes your tested Java application as a container image to Docker Hub.

The following picture shows the main steps in the pipleline:

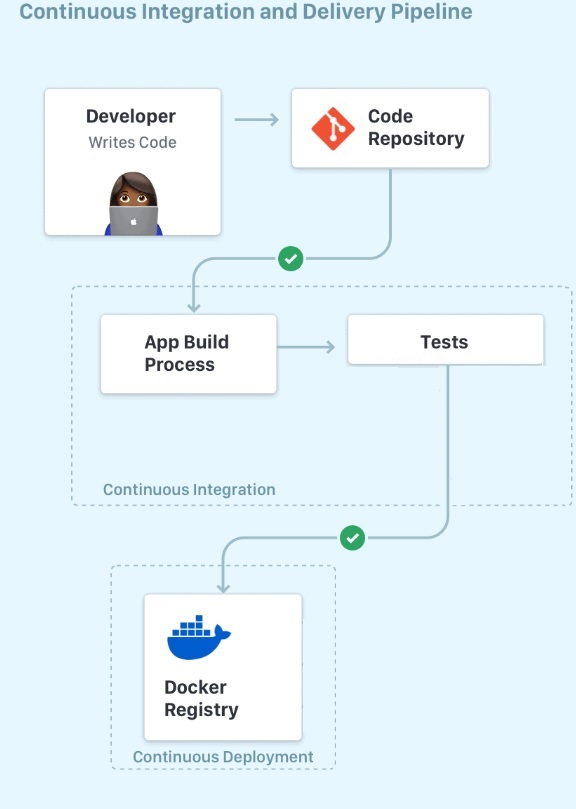
Anytime a developer pushes code to the repo the latest code is built, before the tests are run against it. Once all tests are exectued (and passed), we publish the latest build of the app (i.e. JAR file) as a docker image into Docker Hub.

IDE & Build Tools

The instructions that follow use Gradle & Intellij, but feel free to use an IDE/tools of your choice!

ci-helloworld

The complete code for ci-helloworld example (that we create step-by-step in the following several sections) can be found at: https://github.com/jhu-st/ci-helloworld/

Create a Java Gradle Project#

Create brand new Java Gradle project called ci-helloworld.

  1. Under src/main/java folder, create a class named ArrayUtils.java with two methods:
public class ArrayUtils {
/**
* Find last index of element
*
* @param x array to search
* @param y value to look for
* @return last index of y in x; -1 if absent
* @throws NullPointerException if x is null
*/
// test: x = [2, 3, 5]; y = 2; Expected = 0
public static int findLast (int[] x, int y) {
for (int i=x.length-1; i >= 0; i--) {
if (x[i] == y) {
return i;
}
}
return -1;
}
/**
* Count odd or positive elements
*
* @param x array to search
* @return count of odd/positive values in x
* @throws NullPointerException if x is null
*/
// test: x = [-3, -2, 0, 1, 4]; Expected = 3
public static int oddOrPos(int[] x) {
int count = 0;
for (int i = 0; i < x.length; i++) {
if (x[i] % 2 != 0 || x[i] > 0) {
count++;
}
}
return count;
}
}

Next, create a second class named Main which is where the main function resides:

public class Main {
public static void main(String[] args) {
System.out.println("Main Executed!");
}
}

The main function does not do much but we simply include it to have an entry point of execution for the project (if the project is ever executed!); The goal of our project is though to have a set of unit tests (see next step) run against the methods of ArrayUtils class.

  1. Under test/java create a test class named ArrayUtilsTest.java with the following test methods:
import org.junit.jupiter.api.Test;
import static org.junit.jupiter.api.Assertions.*;
public class ArrayUtilsTest {
@Test
public void testFindLastNull() {
// Do not execute fault
assertThrows(NullPointerException.class, () -> {ArrayUtils.findLast(null, 3);});
}
@Test
public void testFindLastEmpty() {
// For any input where y appears in the second or later position, there is no error. Also,
// if x is empty, there is no error.
assertEquals(-1, ArrayUtils.findLast(new int[]{}, 3));
}
@Test
public void testFindLastNonExistent() {
assertEquals(-1, ArrayUtils.findLast(new int[]{1, 2}, 3));
}
@Test
public void testFindLastExistsFirstElement() {
assertEquals(0, ArrayUtils.findLast(new int[]{2, 3, 5}, 2));
}
@Test
public void testOddOrPosNull() {
// Do not execute fault
assertThrows(NullPointerException.class, () -> {ArrayUtils.oddOrPos(null);});
}
@Test
public void testOddOrPosAllPositives() {
// Any nonempty x with only non-negative elements works, because the first part of the
// compound if-test is not necessary unless the value is negative.
assertEquals(3, ArrayUtils.oddOrPos(new int[]{1, 2, 3}));
}
@Test
public void testOddOrPositiveBothPositivesAndNegatives() {
assertEquals(3, ArrayUtils.oddOrPos(new int[]{-3, -2, 0, 1, 4}));
}
}
  1. Next is build.gradle:
plugins {
id 'java'
id 'jacoco'
}
group 'org.example'
version '1.0-SNAPSHOT'
repositories {
mavenCentral()
}
dependencies {
testImplementation 'org.junit.jupiter:junit-jupiter-api:5.8.1'
testRuntimeOnly 'org.junit.jupiter:junit-jupiter-engine:5.8.1'
}
test {
useJUnitPlatform()
}
jar {
manifest {
attributes 'Main-Class': 'Main'
}
}
jacocoTestReport {
dependsOn test
reports {
csv.required = true
}
}
tasks.withType(Test) {
testLogging {
exceptionFormat "full"
events "started", "skipped", "passed", "failed"
showStandardStreams true
}
}

This makes sure that both JUnit and Jacoco are imported into the project. It also has instructions on how to make a JAR file by specifying the "main" class of the project (i.e., the class that contains the main function). Finally, it has instructions for printing each test case status on the standard output when the tests are executed.

  1. Last but not the least, add, commit and push the project to a Github repo named ci-helloworld on your Github account.